Mirodoll Muscle Body Corset Pattern
This is the test pattern; and I will show you how I get these done--I start out with the doll and some tape and Kleenex:
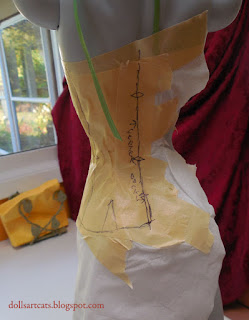
I use tape to mold around the figure, taping over the Kleenex so the tape sticks to the body in just a few tiny places (enough to hold it on, barely). I only do one side so I can peel it off without using scissors. The pattern pieces can be flipped over to make both the left and right sides at the end.
Once I cover the areas I want, I take a pen and mark where I will cut, and I make notes on what the different pieces go to, like Center Front, Center Back, Side etc.. Also I write what doll it is for :D
I am trying to break the pattern apart in the places that will be the "curviest" so I will end up with a flat pattern.
Peel off your proto-pattern carefully...
Lumpy parts that stick up might need to be split for darts.
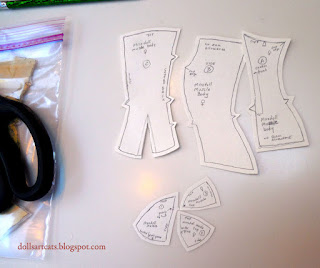
Now everything is mostly flat. Now I need to trace around these on regular paper or tracing paper, and add the tiny seam allowance: (size of seam allowance depends on how you want to finish the edges and the type of fabric.) Here I think I will make tiny seams and put glitter glue along the seams on the outside and a bit of lace along the hem edges. No lining for this one.
Original tape pieces are saved in a bag in case I goofed somehow.
Now the pieces are cut out. When the pieces are so tiny it's easier to cut out the pattern first and then trace around them with chalk or pen. If you like to cut through the pattern and fabric at the same time, do the clean pattern pieces on tissue, and leave lots of room around each piece-- so you can move the scissors comfortably as you cut.
I wanted to test those little "cup" pieces because I wasn't sure I would get the curve I wanted. So far they look OK but I need to cut out and sew the rest to be sure they are in the right place. Luckily the pieces are so small just any scrap makes good test fabric.
More tomorrow!
I use tape to mold around the figure, taping over the Kleenex so the tape sticks to the body in just a few tiny places (enough to hold it on, barely). I only do one side so I can peel it off without using scissors. The pattern pieces can be flipped over to make both the left and right sides at the end.
Once I cover the areas I want, I take a pen and mark where I will cut, and I make notes on what the different pieces go to, like Center Front, Center Back, Side etc.. Also I write what doll it is for :D
I am trying to break the pattern apart in the places that will be the "curviest" so I will end up with a flat pattern.
Lumpy parts that stick up might need to be split for darts.
Now everything is mostly flat. Now I need to trace around these on regular paper or tracing paper, and add the tiny seam allowance: (size of seam allowance depends on how you want to finish the edges and the type of fabric.) Here I think I will make tiny seams and put glitter glue along the seams on the outside and a bit of lace along the hem edges. No lining for this one.
Original tape pieces are saved in a bag in case I goofed somehow.
Now the pieces are cut out. When the pieces are so tiny it's easier to cut out the pattern first and then trace around them with chalk or pen. If you like to cut through the pattern and fabric at the same time, do the clean pattern pieces on tissue, and leave lots of room around each piece-- so you can move the scissors comfortably as you cut.
I wanted to test those little "cup" pieces because I wasn't sure I would get the curve I wanted. So far they look OK but I need to cut out and sew the rest to be sure they are in the right place. Luckily the pieces are so small just any scrap makes good test fabric.
More tomorrow!


Comments
Post a Comment